There
is actually a method or pattern to the configuration process, and we
are going to walk you through each set of steps. Obviously, certain
choices are your decision based upon your particular environment.
However, after the legacy PBX (with the IP Gateway) or the IP-PBX is
functioning and the server role is installed, the next steps must be
performed in the following order:
1. | Create a dial plan.
|
2. | |
3. | Configure the UM mailbox policy.
|
4. | Configure the Auto Attendant.
|
5. | Enable UM and assign a UM policy to users.
|
Create a Dial Plan
First,
what is a dial plan? These are objects that are created in Active
Directory. They are logical representations of an in-place telephony
dial plan. If you are just testing these features, you can create
whatever you like. However, if you are implementing UM in a real-world
environment, you need to discuss the dial plans with your telephony
administrator. Your UM server must have at least one UM dial plan to
function (although in more complex environments you might have multiple
dial plans in place). The whole purpose of the dial plan is to ensure
that extensions are unique, which can sometimes be a problem if you
have multiple PBXs.
Users
within the same dial plan can call each other by using only the
extension number, and each person has a unique extension within the
same plan. So, for example, you might be 5-9898, and your friend in the
cubicle next to you is 5-9899. Looking at it from that perspective, we
can see that a user can only be part of one dial plan.
To create a dial plan, perform the following:
1. | Open the Exchange Management Console (EMC).
|
2. | From the Navigation Tree, expand the Organization Configuration work center and click Unified Messaging.
|
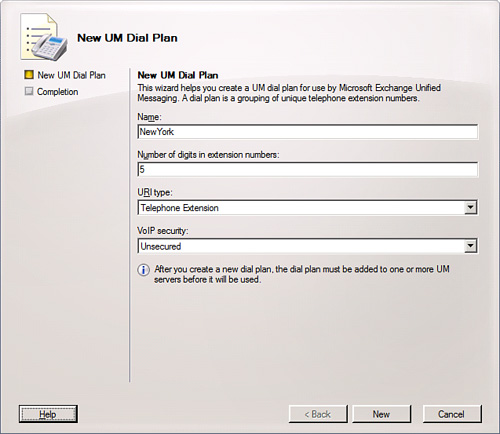
3. | From the Actions pane, select New UM Dial Plan to open the wizard, shown in Figure 1.
|
4. | Provide a name for the dial plan, which might be a location, depending on how many dial plans you need to establish.
|
5. | Enter a number in digits for the extension number.
|
6. | Select a URI Type (Telephone Extension [default], E.164, or SIP URI) depending on your IP Gateway or IP PBX.
|
7. | Select VoIP Security (SIP Secured, Unsecured [default], or Secured).
|
8. | Click New.
|
9. | When complete, click Finish.
|
Upon creation of the new dial plan, a UM mailbox policy is created and associated with that dial plan.
When
you are asked for a URI type, this is a Uniform Resource Identifier
(URI). By selecting a URI type with your dial plan, you have to ensure
that your IP Gateway, IP PBX, or PBX supports the selection you make.
The purpose of the URI is to enable your VoIP devices to communicate
with the Unified Messaging server and services using agreed upon
protocols.
When
choosing VoIP security, the method you select can protect the network
traffic being sent back and on to your Unified Messaging servers.
You
might think creating a dial plan is simple. However, when you select
the plan and go into its properties, you are presented with seven tabs
to work with.
General
Here
you can see basic information about the dial plan. Associated UM
servers and IP Gateways are included. You can also select checkbox
options including the following:
You
can also select the down arrow to choose VoIP security, in the event
you need to change your selection from when you originally created the
dial plan.
Subscriber Access
On the Subscriber Access tab, shown in Figure 2,
you are shown the Welcome Greetings section, where you can leave the
default greeting or create a custom greeting. Select Modify and choose
the .wav file to modify the greeting. This is a nice option for
situations where the company president or perhaps a professional voice
actor can replace the welcome for the company when someone calls in.
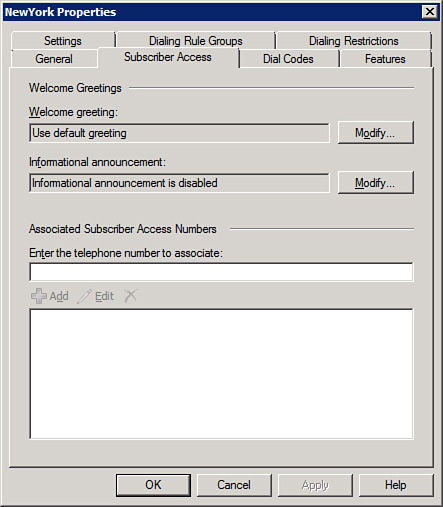
You
can configure the informational announcement, which is disabled by
default. This might be something that changes frequently (perhaps
different promotional or informational information after the greetings
that might change each month). You can select a checkbox to allow the
informational announcement to be interrupted.
Under
Associated Subscriber Access Numbers, you can provide a number to be
associated for the OVA. You have to configure at least one number, be
it an extension or external number (or SIP URI if you use an IP-PBX),
so that you have OVA.
Dial Codes
There
is a section for both incoming and outgoing configuration. Options such
as dialing a 9 to access an outside line, common in many company phone
systems, are configurable here. You can also configure an international
access code, national number prefix, and country/region code for
outgoing configuration and in-country/region or international number
formats for incoming configurations.
Features
The Features tab, shown in Figure 3,
enables you to configure important features of the dial plan. For
example, there are checkboxes, turned on by default, for Allow Callers
to Transfer to Users and Allow Callers to Send Voice Messages.
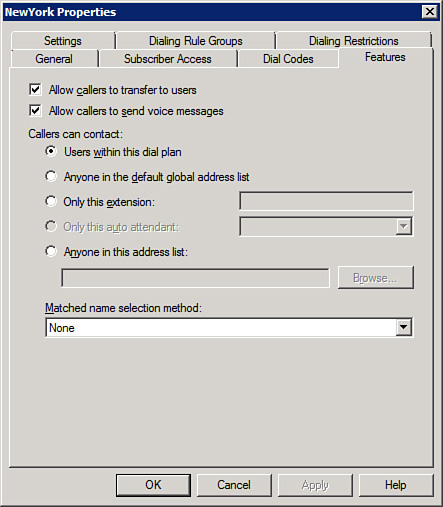
You
can establish who callers can contact. For example, the default radio
selection is Users Within This Dial Plan, but you can choose Anyone In
the Default Global Address List; Only This Extension; Only This Auto
Attendant; or Anyone In This Address List where you can browse to the
address list you want to allow callers to access.
The
Matched Name Selection Method field is used to differentiate people
with the same names. If someone calls for Joe Smith and you have more
than one, the caller can be offered the opportunity to select the
person based upon their Title, Department, Location, or Alias.
Settings
The Settings tab is filled with options for you to configure, including the ones listed in Table 1.
Table 1. Configuration Options on the Settings Tab
| Setting | Default | Options (if available) |
|---|
| Dial by name primary method | Last First | Last First, First Last, SMTP Address |
| Dial by name secondary method | SMTP Address | Last First, First Last, SMTP Address, None |
| Audio codec | WMA | G.711, WMA, GSM |
| Operator extension | (Blank) |
|
| Logon failures before disconnect | 3 |
|
| Timeouts and Retries |
|
|
| Maximum call duration (min) | 30 |
|
| Maximum recording duration (min) | 20 |
|
| Recording idle time-out(sec) | 5 |
|
| Input idle time-out (sec) | 5 |
|
| Input retries | 3 |
|
| Input failures before disconnect | 3 |
|
| Language Settings |
|
|
| Default language | English (United States) |
|
Dialing Rule Groups
The
Dialing Rule Groups tab enables you to add incountry/region rule groups
or international rule groups. Essentially you can configure the rule
group to determine the type of calls users can make within a group.
However, after creating the group, you have to configure the mailbox
policy to specifically use a rule group for policies that you will then
apply to different users.
Dialing Restrictions
This tab enables you to configure dialing rules for those users who call in to a subscriber access number from a UM dial plan.
The
Allow Calls to Users Within the Same Dial Plan checkbox is selected by
default. The Allow Calls to Extensions option is deselected by default.
If you enable this option, users who call in to the subscriber access
number can place calls to other users who might not be UM-enabled. If
disabled, they cannot place calls to users who are not UM enabled.
From
there you can create allowed in-country/regional groups and allowed
international rule groups by selecting the Add button and configuring
the allowed groups.